15 Different Types Of Braids And How To Create Them [Completed Guide]
As long as I can remember, there was never a time when braids were out of fashion; rather, they just kept on evolving and upgrading into different styles. There are a lot of different types of braids that you can try out when it comes to braiding your hair.
You might be thinking that you can only braid your hair if you have long hair, but no, you can braid short hair as well. It is true that not all types of braids cannot be done on shorter hair, such as shoulder length hair.
But there are different braids that can be done on shorter hair, and it will look really good as well. In the article below, there are a lot of great examples of different types of braids that you can try out for yourself.
Different Types Of Braids
There are a lot of different types of braids that you can give a try, but there are a few types that are my personal favorite that I wanna share with you.
These braids are the ones that I often try out. So if you wanna know these different styles, then keep on scrolling through the article.
1. Fishtail Braid

When I was a kid, I used to braid my hair to school regularly. And the type of braid that I used to love the most was the fishtail braid. The fishtail braid is really pretty at the same time, really intricate and elaborate if you try doing it for the first time.
Things you will need:
- Comb or hairbrush
- One or two elastic bands
How to style:
- “Remove the tangles in your hair with the help of a hairbrush.”
- “Gather all your hair and tie it into a ponytail with a hair rubber.”
- “Divide your hair into two equal ‘secions.”
- “Take a thin section of hair from the outer side of the left seciotn and flip it over the inner side of the right section.”
- “Now pick up a thin section from the outer side of the right secion and flip it over the inner side of the left section.”
- “Keep repeating the above two steps till end of your hair.”
- “Secure the ends with a hair elastic.”
- “Cut off the hair elastic at the top of your braid, which you used to make a ponytail to finish off the look.”
2. Simple Braid
There is a reason why the 3-strand braid is also called a classic braid; this is the simplest braid that you can get done easily on your own. This is the first braid that you try to braid out of all different types of braids.
Things you will need:
- Comb or hairbrush
- One or two elastic bands
How to style:
- “Brush your hair and detangle all the knots of your hair.”
- “Divide your hair into 3 equal sections.”
- “Flip the left section over the middle section side.”
- “Now, flip the right section over the right section over the section which is in the middle.”
- “Keep repeating the above two steps.”
- “At last secure the ends within a hair elastic.”
3.French Braid

French braids are one of the simplest and most elegant ways of braiding your hair. Personally, I love a good French braid since it looks really good on both long and short hair.
It is one of those different types of braids that will look on anyone and for any occasion, for that matter. So if you are someone who never tried a French braid, then you should definitely try it out for yourself.
Things you will need:
- Comb or hairbrush
- One or two elastic bands
How to style:
- “Brush out the knots in your hair.”
- “Pick up the front section of your hair from between your temples and divide it into three sections.”
- “Start doing a braid one time.”
- “From the second time, take a 2-inch section of hair from the remaining hair to each of the sides before flipping it over the middle strand of the braid.”
- “Once your French braid reaches the nape of your neck, you run out of hair to add on the braid, then simply braid the rest of the way down and then secure the ends with a hair elastic.”
- “You can tug apart and loosen the braids to make them look more voluminous.”
4. Dutch Braid
If you already know how to do a French braid, then you will know how to do a Dutch braid as well since both of them are pretty similar to each other.
But the only difference is that for Dutch braids, the hair is braided in an underhanded way. This is the reason why the hair sticks out and doesn’t stay tucked in like that of French braids.
Things you will need:
- Comb or hairbrush
- One or two elastic bands
How to style:
- “Detangle your hair knots.”
- “Pick up the front section of your hair from between your temples and divide it into three strands.”
- “Braid it one time before flipping the side sections under the middle section.”
- “Each time, start adding the hair from outside the braid to the side sections before flipping it to the middle section.”
- “Once your Dutch braid reaches the nape of your neck, simply braid the rest of your hair and secure the ends with a hair elastic.”
5. Rope Braid

Calling the rope braids a type of braid is a bit reaching since the hair is not a braid but a twisted style of hair. The hair is twisted in a clockwise direction till the end of the hair length. Then once you reach the end of the hair, then all you need is to clip the end of the hair.
Things you will need:
- Comb or hairbrush
- One or two elastic bands
How to style:
- “Detangle the knots from your hair.”
- “Make a high ponytail using hair elastic.”
- “Divide your hair into two strands.”
- “Twist the two sections individually in a clockwise direction.”
- “Interwine the strands in an anticlockwise direction with each other till the end.”
- “Secure the end with a hair elastic.”
6. Lace Braid
The lace braid is a technical French braid that you can easily get by parting your hair to one side. The lace braid is much more intricate and complicated than a French braid.
Since the braid is angled towards the front of your face that way, you can also have bangs to go along with the one-sided lace braid.
Things you will need:
- Comb or hairbrush
- One or two elastic bands
How to style:
- “Remove the knots of your hair by brushing.”
- “Take three strands of your hair from the top of your head.”
- “Braid it one time and take a section of your hair from the front side and flip it over the middle section and braid them.”
- “Repeat the above steps and then complete the braiding till you want.”
- “Then do the whole process again to make a braid, just the backside of the previous braid.”
- “Secure the ends with a hair elastic.”
7. Crown Braid

The crown braid is a very elaborate and intricate type of braid that you can try out, but it is not for any regular day.
The crown braid usually covers the front of the forehead till the end of the hair and then tie the hair with an elastic. The crown braid is an elegant and classy way of braiding your hair.
Things you will need:
- Comb or hairbrush
- One or two elastic bands
How to style:
- “Detangle your hair knots.‘
- “Divide your hair from the front into two halves.”
- “Pick up three strands of hair from the top of your head from the right part.”
- “Start braiding simply, or you can make Dutch braids, fishtail braids, twist braids, and micro braids as per your need.”
- “Braid till the back of your head and secure both the braids with the bobby pins under the hairs to finish off the look.”
- “Do the same from the left part.”
- “Repeat the above two steps with your left braid, making sure to tuck its ends under the right view before pinning it to your head.”
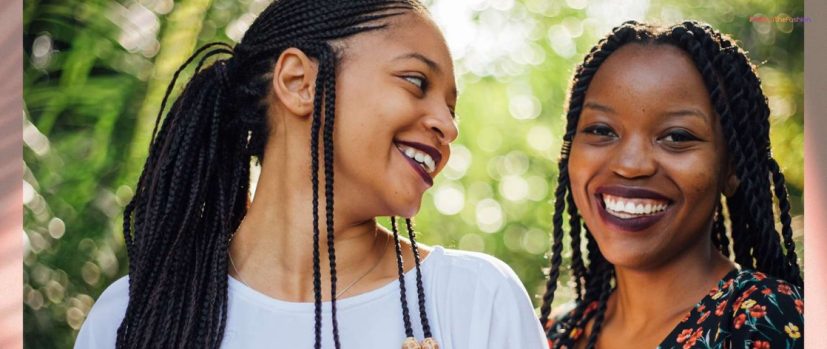
8. Box Braid
Box braids are like other types of braids, such as the bo braids are a protective style of hair braid that is good for your hair maintenance. The box braids are a great way to curl your hair in a natural way without any heat that could damage your hair.
Things you will need:
- Rat tail comb or hairbrush
- One or two elastic bands
How to style:
- “Wash your hair with shampoo and condition your hair and then dry it.”
- “Remove the knots of your hair by brushing.”
- “Divide your hair into several box parts of 1 inch using a rat tail comb.”
- “Use hair extensions to make your braid thicker.”
- “Attach them to your natural hair.”
- “Braid your natural hair in with the hair extensions and begin the braid tight near the scalp.”
- “Secure all the braids individually at the end with a hair elastic.”
9. Pull Through Braid

The pull through hairstyle is a very trending hairstyle that is going on right now. These braids are made to add a certain amount of volume to your hair. This hairstyle is done by tying together several ponytails together in a braided pattern.
Things you will need:
- Comb or hairbrush
- One or two elastic bands
How to style:
- “Remove the knots of your hair by brushing.”
- “Tie a ponytail by picking up a section of hair from the top of your head.”
- “From right under the first ponytail, pick a section of hair and tie it to another ponytail.”
- “Take another section from the right side under the first ponytail and tie them with a hair elastic.”
- “Split the first ponytail into two halves.”
- “Bring the two sections of the ponytail together under the section ponytail and tie then with a hair elastic.”
- “Now pick some hair and tie a ponytail under the second ponytail.”
- “Split the second ponytail in half and join the half under the third ponytail and tie them with a hair elastic.”
- “Repeat this process until you have more hair left.”
- “And at last, you get two strands of the ponytail at the nape of your neck and tie a ponytail to finish off the look.”
10. Reverse Braid
Well, by the name, you can understand very well what the hairstyle is gonna look like. Unlike most braided hairstyles that go down with the twists, the reverse braid actually goes up. The hair is braided up to ultimately form a beautiful little updo.
Things you will need:
- Comb or hairbrush
- One or two elastic bands
How to style:
- “Detangle your hair knots.”
- “Bend and flip all your hair forward in front of you.”
- “Take a section of hair from the nape of your neck and divide it into three stands.”
- “Start Dutch braiding your hair and flipping the side sections under the middle section.”
- “Once your Dutch braid or fishtail braid reaches the nape of your neck, your neck, you can make a ponytail using a hair elastic.”
- “If you want to make a bun, then divide your ponytail into two strands and roll the strands opposite to each other, and secure the bun with some bobby pins.”
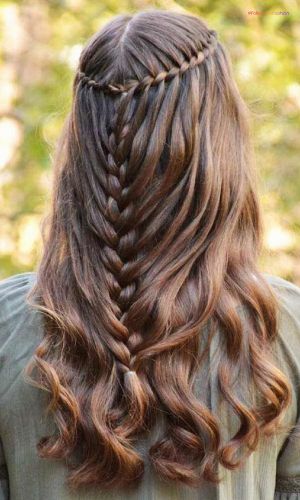
11. Mermaid Braid

The thing with braids is that even with a simple braid, your hair will look very elegant and beautiful. With the mermaid braids, you can look exactly that; a simple braid like that will change your whole outlook.
Things you will need:
- Rat tail comb
- Hairbrush
- One or two elastic bands
- Bobby pins
How to style:
- “Brush out and remove tangles from your hair.”
- “With the tail end of your rat-tail comb, part your hair down the middle.”
- “Now, part your hair till the nape of your neck to divide your hair into 2 equal sections.”
- “Do a simple 3-stranded braid with the section on the right and tie up the ends with a half elastic.”
- “Repeat the above step with the left section of the hair.”
- “Loosen both braids by tugging them apart to make them voluminous and give them more dimension.”
- “To frame your face, pull out a few strands of hair from the front.”
- “Pick up both the braids and the upside.”
- “Secure and join firmly by inserting some boppy pins along the length of this braid.”
- “Repeat the above two steps with your left braids, making sure to tick its ends under the right braid to hide it from view.”
12. Milkman Braid
The milkmaid braid is something that is quite intricate and tricky to get done just right. This braid has a very clean outlook; even though this might look simple and elegant, it is hard to get just right.
Things you will need:
- Comb or hairbrush
- One or two elastic bands
How to style:
- “Remove the knots from your hair using a brush.”
- “Create a center part and let your bangs outside the braid.”
- “Part yout hair till the nape of your neck and tie it into two ponytails.”
- “Simplly braid your hair or make a fishtail braid.”
- “Secure the ends with a hair elastic.”
- “Place both the braids across the top of the head.”
- “Use bobby pins to secure the braid, and try your best to hide the hair elastics.”
13. Ladder Braid

The ladder braid is something that was very popular in medieval times, and they are still considered to be a classic hairstyle that is perfect for formal and elegant events.
Things you will need:
- Comb or hairbrush
- One or two elastic bands
How to style:
- “Detangle your hair.”
- “Make a ponytail using a hair elastic.”
- “Take a section of hair from the middle of the ponytail and start braiding.”
- “After braiding one time, pick up a section of hair from either the right or left side and flip it over the middle section of the braid and make long braids.”
- “Secure the ends with a hair elastic after braiding.”
14. Cornrow Braid
Out of all the different types of braids, the cornrow braids are among the traditional braids that you can try out. This braid is the only one that needs to be braided from the scalp. This type of braid is done to protect your hair from any damage and dirt.
Things you will need:
- Comb or hairbrush
- One or two elastic bands
How to style:
- “Detangle your hair using a hairbrush.”
- “Divide a scalp section from the top of your hair.”
- “Again part the section into three strands and start braiding.”
- “Pick up small sections outside the three strands and flip them over or under the middle strand.”
- “Repeat the above step with other scalp sections and braid till you run out of hair.”
- “The simply braid to the length of your hair and secure the ends with hair elastics.”
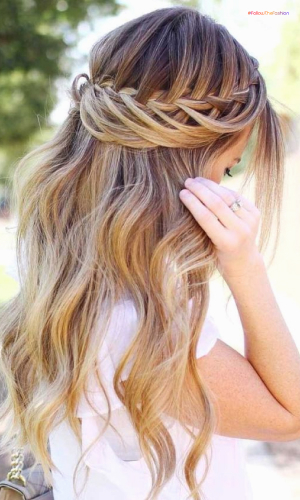
15. Waterfall Braid

Since we are talking about different types of braids, it would be unfair not to mention the gorgeous waterfall braids. This braid style might be a bit difficult to perfect on your own, but for certain special occasions, this is a beautiful hairstyle to try out.
Things you will need:
- Comb or hairbrush
- Multiple bobby pins
How to style:
- “Remove all knots and targets.”
- “Part your hair on one side.”
- “From the side of your parting with more hair, pick up 3-inche strands of hair from the very front.”
- “There will be three sections of hair-top, middle and bottom.”
- “Do a simple 3-strand braid one time.”
- “Leave the bottom section and take a new section of hair from right next to it and flikp over the middle section. This will create the waterfall effect.”
- “Add more hair from the top of your head to the top section before flipping it over to the middle section.”
- “Keep repeating the above two steps until your waterfall braid has reached the backside of your head.”
- “Do a simple braid to 3-4 more times before pinning up the braid at the backof oyur head. And pin it under your hair to hide the bobby pins from view.”
Wrapping Up!
Well, there you go; these were a few of the different types of braids that you should try for yourself and see for yourself how it looks. All these braided hairstyles are really good, and you can even do them yourself.
Of course, a little bit of practice is needed at first. Now if you liked any of these different types of braids, then don’t forget to give this article a like and also give a comment down below.
Read Also:


